The automatic installation of a plugin is easy and straightforward. However, you can also install it manually. It will involve manually downloading a plugin, uploading, and activating it.
Make sure you have already downloaded a zip file of the plugin to your desktop.
1. Log in to the WordPress dashboard.
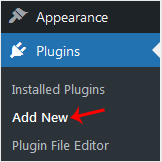
2. From the Dashboard menu, go to Plugins and click on Add Plugin.
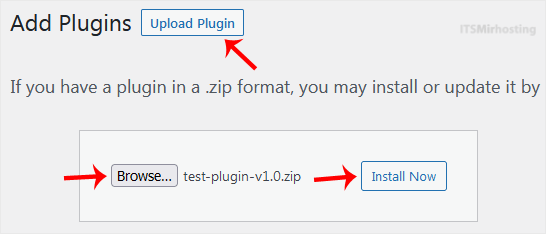
3. Click on Upload Plugin and then on Browse. Choose your plugin's zip file and click Install Now.
4. Click on Activate Plugin.
Note: After activating a plugin, a new menu of that plugin is added to the Dashboard menu.
Categories
Backup/Restore
4
CloudLinux (cPanel)
10
cPanel - Control Panel
24
Databases
11
DirectAdmin
48
DNS - Nameservers
6
Domain Management
10
Email
17
FTP
9
Installing a Control Panel
6
Mail Filters & SPAM
8
Mobile
11
Others
3
PayPal
7
Plesk
47
Security
10
SiteWorx/InterWorx
58
Softaculous
69
SolusVM 1
18
SolusVM 2
16
SSL
5
Virtualizor
19
WHM
18
WordPress
17
Categories
How to Manually Install a WordPress Plugin Print
- 0
Was this answer helpful?
Related Articles
How to Access the WordPress Admin Dashboard
WordPress is an easy to work with CMS software. To access a WordPress account, please follow...
How to Remove Sample Comments and Posts From WordPress
You get sample comments and posts in a fresh WordPress install. You can easily remove them in the...
How to Write and Publish Your First Blog Post in WordPress
Writing your first blog post is a fascinating thing. Follow the steps below to do so in...
How to Remove a Post in WordPress
You can remove the published or draft post in WordPress.1. Log in to the WordPress dashboard.
2....
How to Bulk Delete Posts in WordPress
It is possible to delete posts in bulk using WordPress. You can also delete selected posts in...
Powered by WHMCompleteSolution


